Sending a gift card reward involves four steps: choosing a card type, setting up a delivery email, specifying your recipients, and placing the order.
Giftronaut supports two card types: Branded Card and Choice Card. If you're unsure which to use, Choice Card is the most commonly used option and works well when you want to give recipients flexibility.
| Branded Card | Choice Card | |
|---|---|---|
| Brand selection | You choose (e.g. Visa, Amazon, Starbucks) | Recipient chooses their preferred brand. |
| Redemption | Redeemed directly with the selected brand | Redeemed as the recipient's selected brand |
| Denomination | Fixed denomination or denomination range, depending on the brand | Flexible face value |
| Best for | Targeted rewards tied to a specific brand | General incentives and recipient choice |
Both card types require a productId — but they come from different catalogs.
You can also browse all available branded cards visually in the portal: Brand Catalog (Please note that the public catalog may not reflect real-time availability. For the most accurate and up-to-date catalog data, utilize the API.)
Branded Card — Query the product catalog to find the brand you want to send. Each product corresponds to a specific brand and currency (e.g. Starbucks in USD).
GET/api/v1/catalog/branded-cards
Choice Card — Query the choice card catalog to find a card design. Each product corresponds to a card design, not a specific brand — the recipient picks the brand at redemption.
GET/api/v1/catalog/choice-cards
POST
/api/v1/orders/branded-cards
— requires productId from the catalog.
{
  "productId": "GC-AMAZON-USD",
  "recipients": [
    { "firstName": "Alice", "email": "alice@giftronaut.com", "amount": 50 }
  ],
  ...
}
POST
/api/v1/orders/choice-cards
— requires productId from the choice card catalog.
{
  "productId": "CHOICE-GLOBAL-USD",
  "recipients": [
    { "firstName": "Bob", "email": "bob@giftronaut.com", "amount": 100 }
  ],
  ...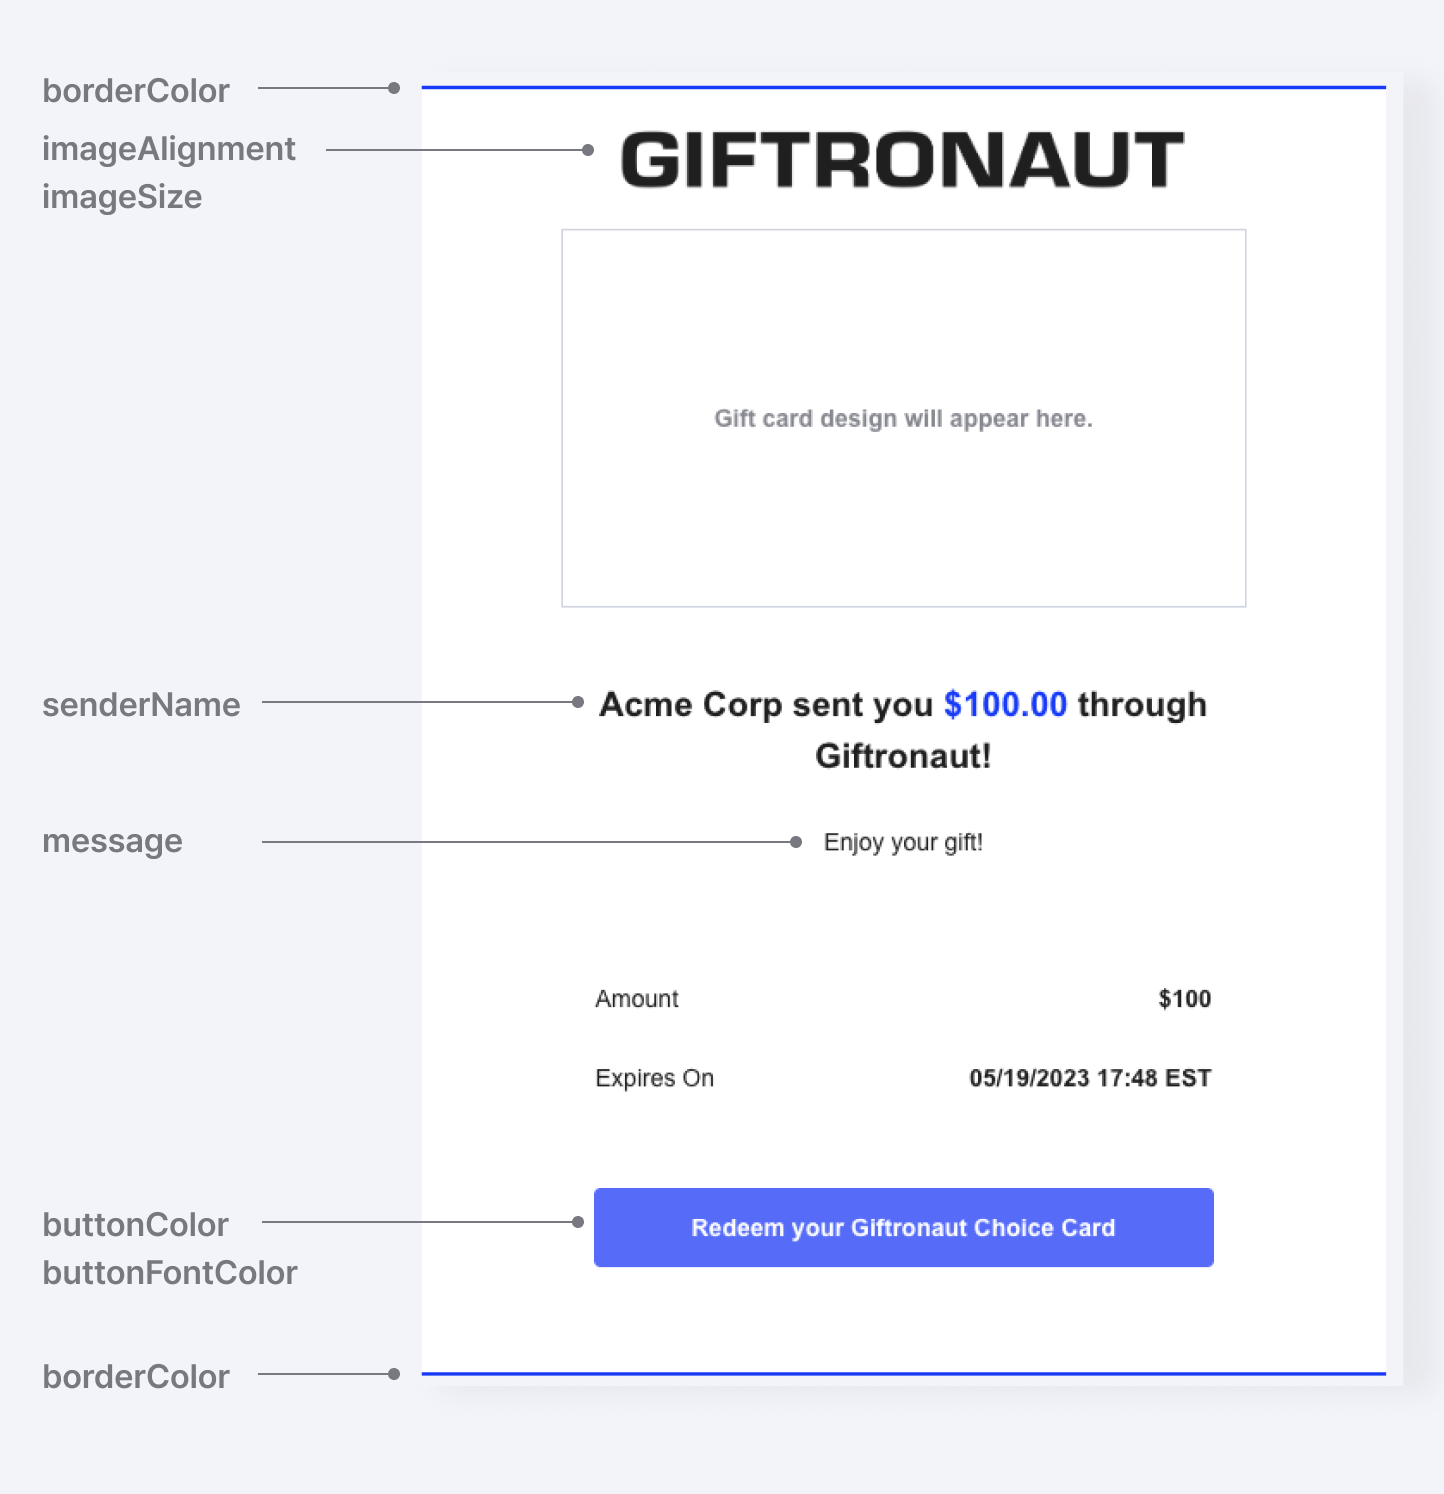
}All gift cards are delivered by email. You can customize the sender name, subject line, message, brand logo, and colors using an email template.
Templates control the banner image, layout, button colors, and border style of your delivery email. Create one with POST /api/v1/templates:
{
  "name": "Giftronaut Blue",
  "senderName": "Giftronaut",
  "message": "Enjoy your gift!",
  "imageAlignment": "center",
  "imageSize": 40,
  "borderColor": "#1F35FF",
  "buttonColor": "#1F35FF",
  "buttonFontColor": "#ffffff"
}
Save the templateId — you'll reference it when placing orders.
namesenderNamemessageimageAlignmentleft | center | right. Default centerimageSizeborderColor#303033buttonColorbuttonFontColor#RRGGBB).
Templates are applied to recipient emails as shown below.
Include an emailSetting object in any order request to customize the delivery email:
{
  "productId": "CHOICE-GLOBAL-USD",
  "recipients": [ ... ],
  "emailSetting": {
    "senderName": "Giftronaut Rewards",
    "subject": "Your reward is here!",
    "message": "Thank you for your contribution.",
    "templateId": "15"
  },
  ...
}senderNamesubjectmessagetemplateIdThere are two ways to specify recipients. For a quick one-off send, include them inline. For recurring sends, build an address book.
Include the recipient list directly in your order request. Each recipient can receive a different denomination.
{
  "recipients": [
    { "firstName": "Alice", "lastName": "Kim", "email": "alice@giftronaut.com", "amount": 50 },
    { "firstName": "Bob",   "lastName": "Lee", "email": "bob@giftronaut.com",   "amount": 25 }
  ]
}Save recipients via POST /api/v1/recipients and organize them into groups. Reference a group in your order to avoid re-submitting the same list every time.
Now put it all together. Pass your productId, templateId, recipients, and (optionally) a scheduled send time.
curl -X POST "https://api.giftronaut.com/api/v1/orders/branded-cards" \
  -H "Authorization: Bearer YOUR_ACCESS_TOKEN" \
  -H "Content-Type: application/json" \
  -d '{
    "idempotencyKey": "550e8400-e29b-41d4-a716-446655440000",
    "productId": "10042",
    "emailSetting": {
      "senderName": "Giftronaut Rewards",
      "subject": "Your gift has arrived!",
      "message": "Thank you for your contribution.",
      "templateId": "15"
    },
    "sendTiming": {
      "type": "SCHEDULED",
      "scheduledAt": "2024-12-25T09:00:00",
      "timezone": "America/New_York"
    },
    "recipients": [
      { "email": "alice@giftronaut.com", "firstName": "Alice", "lastName": "Kim", "amount": 50 }
    ]
}'sendTiming entirely, or set type to IMMEDIATE.
Scheduled orders can be cancelled any time before scheduledAt using
DELETE /api/v1/orders/{orderId}
.
idempotencyKey to every order creation request.
If the same key is submitted twice — say, due to a network timeout — the second request is rejected with 409 DUPLICATE_IDEMPOTENCY_KEY instead of creating a duplicate. To confirm whether the first request succeeded, look up the order with GET /api/v1/orders?clientOrderId={key}.
Start typing to search...
Select the APIs you want to integrate. A ready-to-use Markdown file with full API specs and a project context template will be generated and downloaded. Paste it into your AI assistant to get started instantly.